1. Overview
tomehost is a SaaS ("software as a service") designed to simplify the process of creating and maintaining technical manuals, user guides and other structured documentation.
Within our system, we call these documents 'tomes'.
Unlike traditional content management systems, data in a tome is structured in sections, which can be nested to any number of levels, rather than pages.
But the real power of tomehost is the way it lets you get users from a problem to a solution in a single click.
For web-based control panels and interfaces, we provide a simple way to embed popup help to just the right section of your user documentation within the page where a user is working.
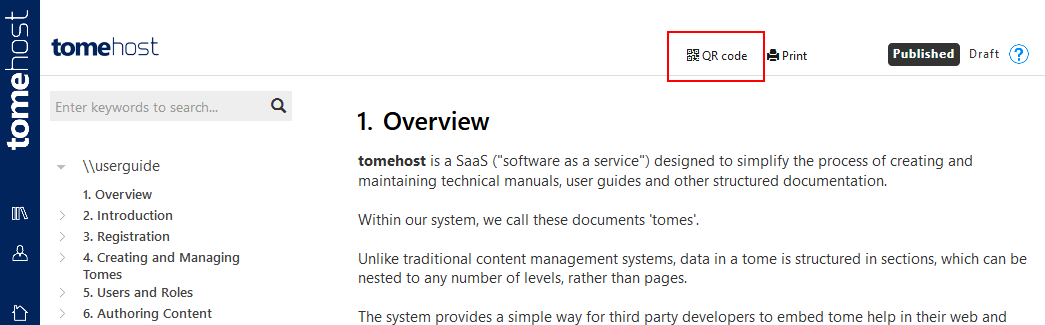
For physical products such as machinery, we provide a simple way to generate QR codes that will pull up the specific section of your user documentation on a mobile phone or tablet when you point a camera at them.
Unlike PDF or Word documents, tomehost is responsive, and will reformat to different sized screens. It is far easier to edit and publish small changes, and to let multiple authors work on different sections at the same time.
2. Introduction
2.1. Platform
tomehost is software which runs on the web. This means it can be used by anyone with access to a modern web browser (Chrome, Edge, Firefox, Safari, IE 10+). It's responsive, which means that the page layout will reformat on smaller screens like mobile phones or tablets, to make it easier to use.
SaaS requires no special hardware, software, infrastructure or IT expertise - all of these are handled by the platform subscription.
2.2. Advantages over conventional documentation
Most organizations still deploy documentation in paper versions, or electronic files like Word documents or PDFs.
tomehost has a number of advantages over these more traditional methods:
- up-to-date - user always sees the latest published information unlike paper or PDFs and Word docs, where users can retain old versions and may be unaware of updates
- simplicity - the system takes care of the numbering and formatting, so users can concentrate on the content
- speed - small edits can be made and published in seconds
- multi-user - teams can work simultaneously from multiple locations, with source-control style permissions stopping users from overwriting each others' work
- process - a variety of user-roles allows more formal processes to be put in place for publication, with some authors able to create and edit content, but not publish. Editors can be appointed to proof-read, revise and publish content.
- usability - direct web links to any heading at any level, layout reformats for optimum usage on mobile and tablet devices
- embedding content - we provide a simple way to embed help popup windows within your own web applications that target the specific section or subsection you want, saving users valuable time as they can pull up the information they need with a single click and stay within your web application or panel
For organizations that already put documentation online using a CMS (content management system) or templating systems, tomehost provides other benefits:
- granularity and structure - the ability to nest content several levels deep and easily reorganize sections as the documentation develops
- fixed URLs - pages accessed via links which remain constant even when headings are moved or renamed
- embed help content into web back end - we provide simple tools to let you integrate tomehost content directly into your web admin panels via resizable, non-modal popups
- no special markup - no HTML or wiki type notation is required, anyone who can write an email or use a word processor can create tomehost content
2.3. Cost
At present, tomehost is free. In future, we will add additional features which will be available under paid plans too, but will always retain a free, entry-level service. We will also provide paid plans for free to verifiable open-source projects. Contact us for details.
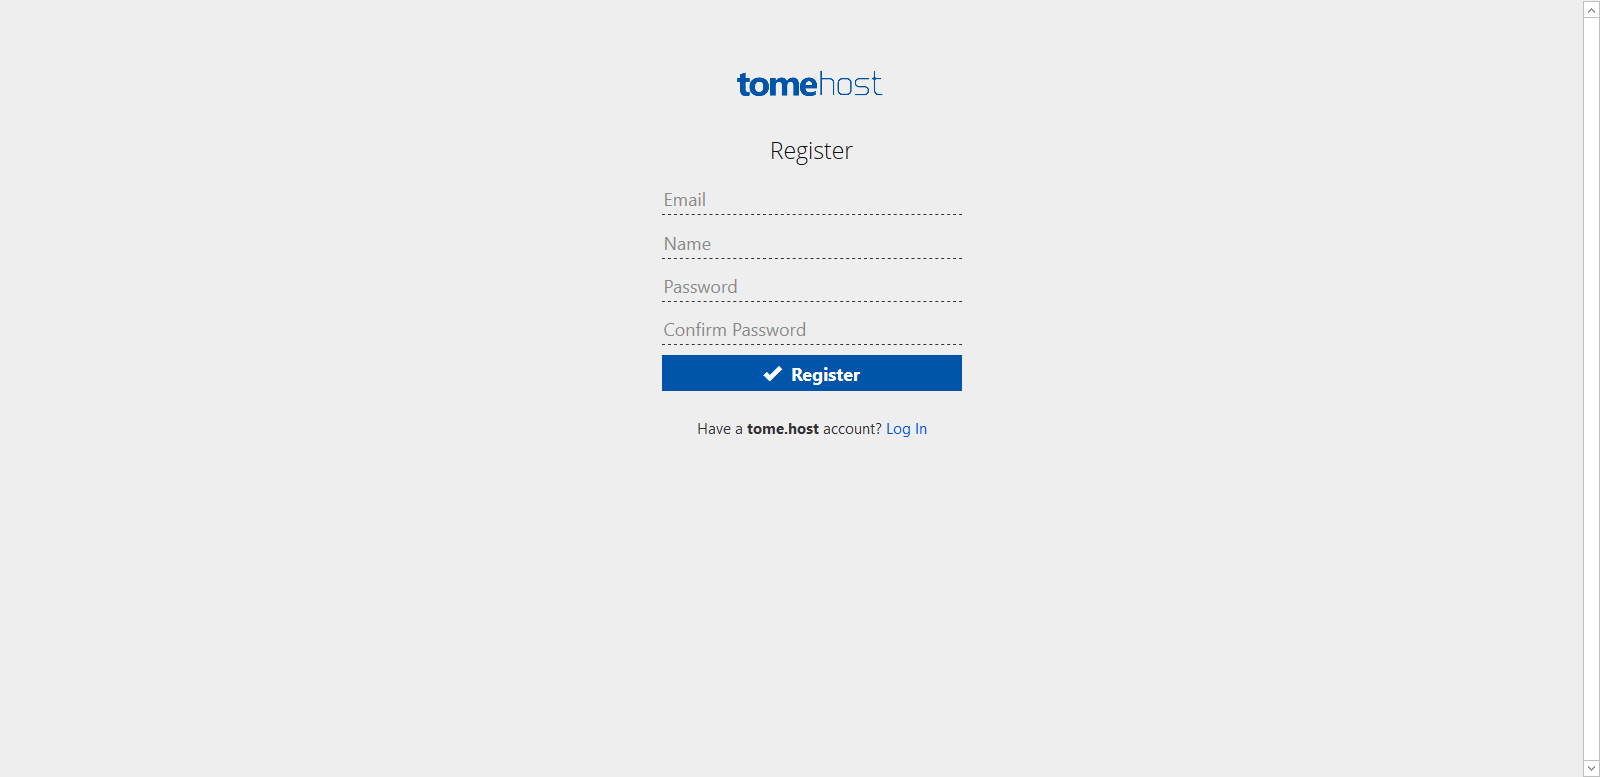
3. Registration
To create or contribute content to a tome, you must have a user account. You can sign up from tomehost for an account. Alternatively, if someone invites you to contribute to a tome, you will be sent a link that will allow you to create an account and join a tome.
3.1. Confirmations
You must confirm your account after registering by clicking on the link you'll receive by email. This is to ensure that your email address is correct, and belongs to you.
3.2. Password reset
Passwords in the database are salted and hashed, meaning that we have no way to recover your password if you forget it. However, there is a reset mechanism that will send and email with a temporary link that can be used to reset the password.
3.3. Email address changes
At present there is no mechanism to change the email address of an account. Since all emails are verified (to ensure you cannot sign up with a fake email address, or an address that does not belong to you), the procedure for this will require you to contact tomehost support to request a change.
4. Creating and Managing Tomes
4.1. What is a tome?
A tome is defined in the dictionary as "a book, especially a large, heavy, scholarly one."
We use the term "tome" to refer to a named container of content, consisting of nested headings, and the various text, image and other content under them.
Typically you would create a tome for a particular product or service, to hold instructions or other technical information.
4.2. Creating/editing a tome
To create a tome, go to the "My Tomes" page and click the "New Tome" button.
If you upload a logo, this will appear in the 'My Tomes' list, and also at the top of the page when users view the tome.
The tome title is optional. If set, this will show as the title of the tome in the 'My Tomes' list, and also at the top of the page when viewing the tome if there is no logo uploaded.
If there is no logo or title, the tome name (a required field) will show both in the 'My Tomes' listing and at the top of the page when viewing the tome.
The description is optional, and just gives a brief overview for you own reference. We may in future pull this into an 'about' page for each tome, or provide it as popup information, so don't put any sensitive internal information here.
4.2.1. Tome name limitations
Tome names must be between 4 and 100 characters long, and may contain only upper or lowercase letters, numbers, or dashes.
The name you choose will form the address for the tome, for example a tome named "userguide", has the address:
Because the tome name is used in URLs, you should ensure that it is something that is broadly descriptive or relevant to the content.
You can change a tome name later, as long as the new name you want is not already taken. However, it is strongly advised NOT to do this once a tome is established, as existing links in search engines, forums and so on to your tome will no longer work. It makes sense to think carefully about your tome name and get it right first time.
4.3. Importing and exporting tomes as XML
tomehost can export and import tomes in an XML format called DocBook XML, which is designed for storing books. We chose this format as it is a documented standard and supports the data types we need, as well as section numbering.
The version we use is DocBook v5. For more information about the XML schema, see https://docbook.org.
Some DocBook XML files exported from third-party applications may not be recreated in their entirety within tomehost, depending on what features and types of sections they contain.
4.3.1. Exporting
There is an export button on each tome, when you view the list.

It is good practice to regularly save XML exports of your tomes as a backup. You can easily import them into a new tome if your original tome content was accidentally deleted or otherwise damaged.
4.3.2. Importing
tomehost has support for importing tomes in Docbook v5 format too. This is primarily intended for importing tomes exported from tomehost, rather than third party XML imports.
Not all DocBook v5 content features are incorporated, so you may find that third party file imports fail, or are missing some sections.
The import process will try to retrieve files such as images and downloadable files from the original tome. If these are no longer present, you may find content is missing from your new tome.
4.3.3. Cloning / duplicating a tome
There is no specific 'clone' feature, however this is simple to accomplish using the import/export features. Simply export a tome, and then reimport the file as a new tome.
4.4. Opening a tome for editing
In the listings within "My Tomes", click on the name of the tome to view that tome.
4.5. Managing tomes
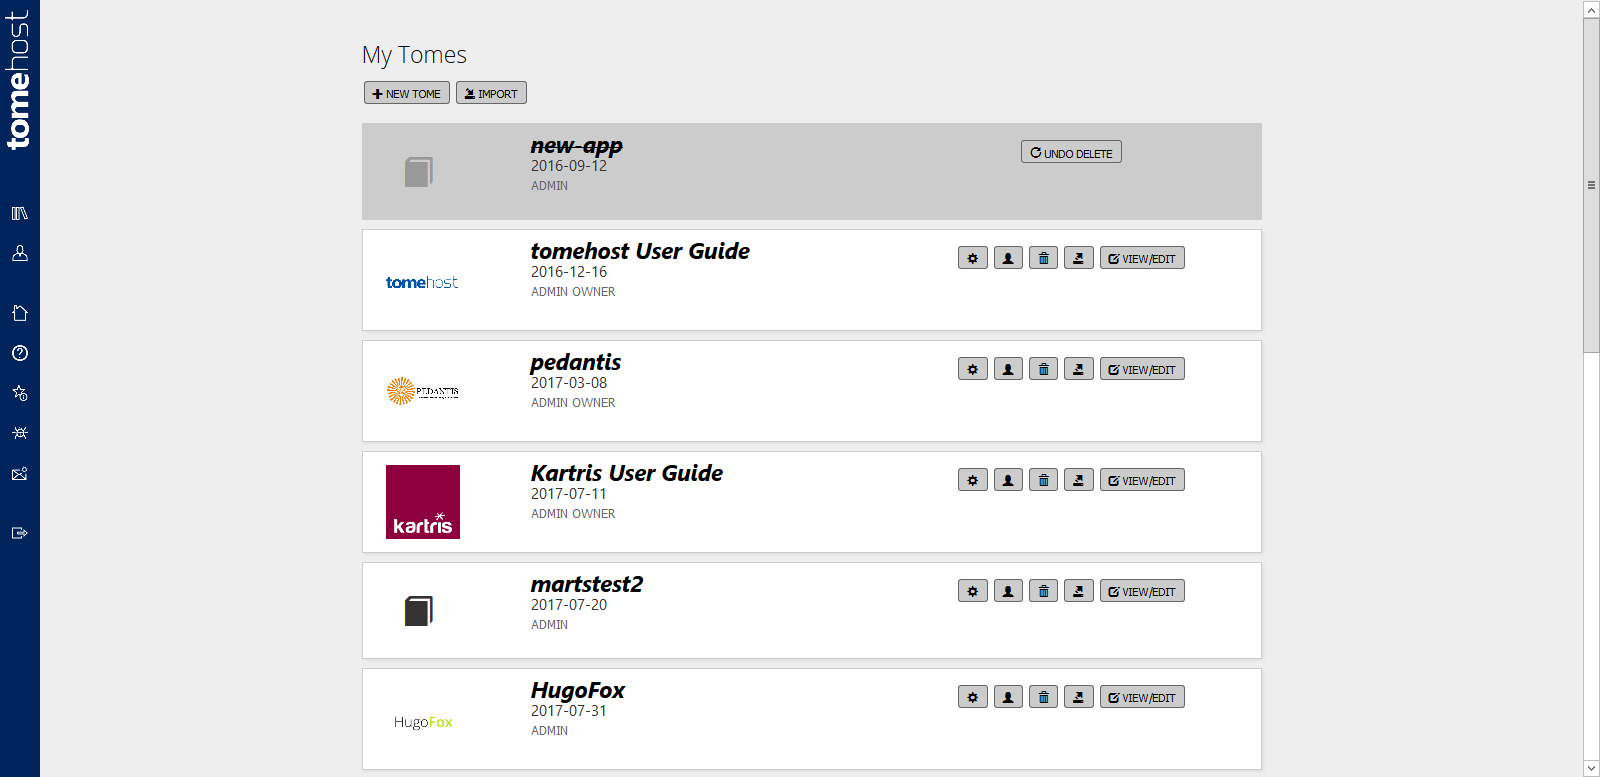
Go to "My Tomes" to list your tomes. Admins of a tome will see a full set of options, whereas contributors and editors can only view/edit tome content.
Deleted tomes will display on the system and can be undeleted for a period of a week or so, before they will be cleaned up permanently.
4.6. Public and private tomes
For tome owners who are on paid plans, there is the option to make tomes private. This means that the published version is not open to anyone to view, but instead only to registered users to whom you have given access.
Go to the tome's settings and set the 'visibility' dropdown.
You can invite members to a tome and set them as 'read-only' users for this purpose. They will not be able to make changes and can only view the published content.
5. Users and Roles
Many documentation projects require that authors who might be in different departments, working on different features or even based in different locations can collaborate on a single tome.
To ensure that multiple users don't interfere with what others are working on, tomehost employs a permissions system that will be familiar to computer programmers who use source control to allow multiple users to collaborate on software development.
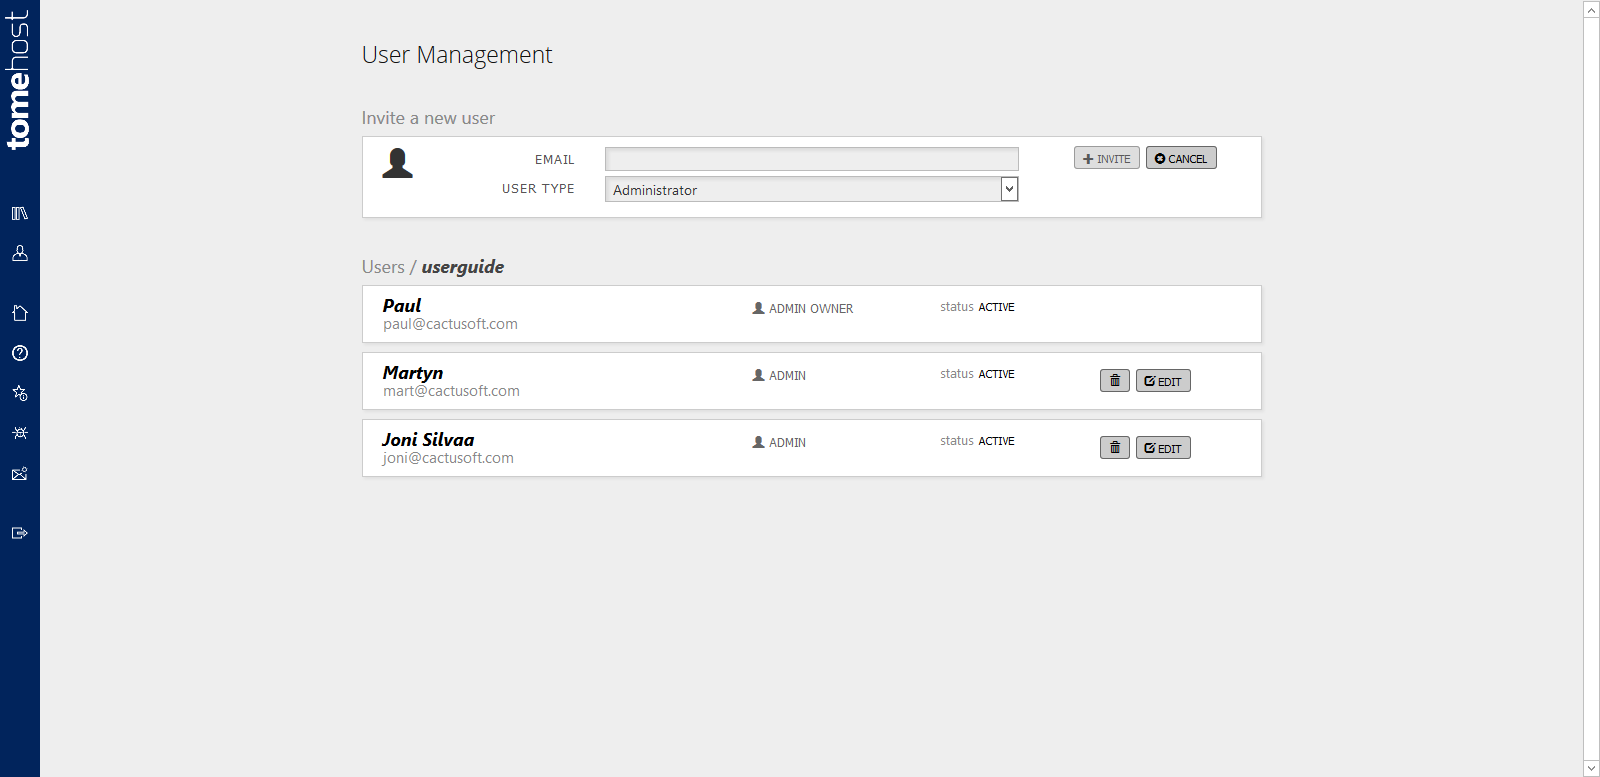
5.1. Managing users
If you view 'My Tomes', each tome has a 'User Management' button. Clicking this brings up a page where you can invite new users, or edit/remove existing users. You can also resend invites to users who may not have received the first email for whatever reason.
5.2. User roles
There are several different user roles, each with a different set of permissions.
The role a user has can vary from tome to tome. For example, tommy@tomehost.com can be an administrator on one tome, an admin owner of another, and just a read-only user on another.
5.2.1. Administrator
Administrators have full permissions on the system. They can create/edit content, publish content and manage users. They can also unlock or publish content that is checked out to another user.
5.2.1.1. Admin owner
Each tome has a single admin owner - the user who created it.
Admin owners have the same permissions as administrators.
The features and options available within a tome will derive from the package which the admin owner of the tome has with tomehost. For example, if the admin owner has an enterprise package, any tomes they own will have enterprise features available.
5.2.2. Editor
Editors can create/edit content and publish content. They cannot unlock content checked out to others, and they cannot invite users to a tome or otherwise manage users.
5.2.3. Contributor
Contributors can edit/create content, but they cannot publish it. Once they have completed their work, they should unlock it so that an editor can check and publish it.
5.2.4. Read-only user
On private tomes (paid accounts only), only users of a tome can view its content - the tome is not visible publicly. The read-only user provides access to view private tomes, but has no ability to edit/create content or make any other changes to the tome.
5.3. Sending invites
You can send invites to colleagues or other people that you want to contribute to a tome that you're a member of. If they don't have an account on tomehost already, they will be sent a link that will guide them to set up an account and then map them as a user of the tome. If they already have an account on tomehost then clicking the link in the mail will link their account to the new tome so they'll have full access to it.
5.4. Checking out content
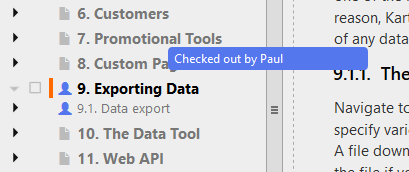
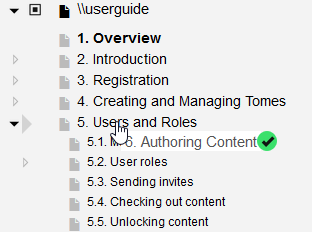
When a user edits any heading or content within a section, or moves a section, that entire section will be checked out to them. This is signified in the left hand menu with a green tick.

If content is checked out to you, other authors will see it appear on their menu with a blue icon. They will not be able to edit or make changes to it. If you hover over content or headings that are checked out to other users, a tool tip will tell you who it is checked out to. This way, you can contact that person if (for example) there are urgent changes you need to make to it.
5.5. Unlocking content
Publishing content automatically unlocks it; other authors will be free to make changes to that section (which will lock it to them).
Sometimes, you may not want to publish a section, but might want to unlock it so that another author can work on it. In this case, select the section in the left hand menu and use the 'Unlock' button.
The content will remain green (indicating it is not yet published, and is different to the live version), but the icon will revert to the document one.

6. Authoring Content
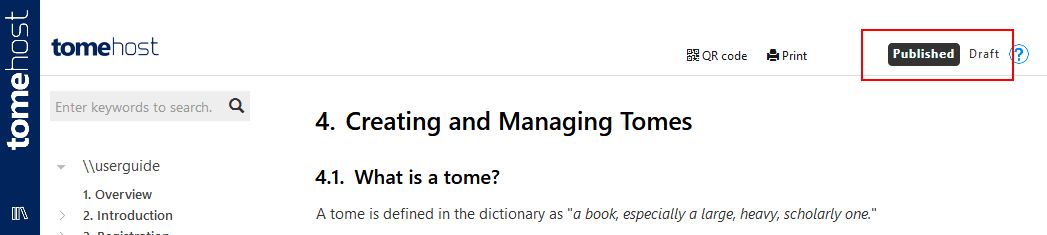
6.1. Draft and published
When writing content, you work in the 'draft' version. This is not visible to the public until you publish it. You can switch between the published view and the draft view with the buttons towards the top right of the page.
The draft view has a grey background to differentiate it from the published view which has a white background.
6.1.1. Archiving
There is actually a third set of content that you cannot see - the archive. Whenever you publish changes, the present 'live' content is moved to the archive, and then the draft content is published - updating the 'live' with your changes.
In the future we intend to have features that let you view previous versions of content and other archive details.
6.2. Starting off
Once you've clicked though to start working on your new blank tome, you should see an instruction to right-click on the root of the tome in order to add your first heading.
Once you have added a heading, you will see this on the screen in the main area. You will notice that as soon as you click off the text area, the content saves. You don't need to manually save as you go, any changes to text or headings or other content is automatically saved when you click elsewhere.
6.3. Content block types
Currently we support:
- Text
- Warning text (text with warning sign and red colouring)
- Info text (text with info sign and orange colouring)
- Images (with optional caption)
- Code (SQL, HTML, C#, php, etc.)
- Video (embed videos)
- File download
6.3.1. Examples
6.3.1.1. Text
Just regular text
6.3.1.2. Warning Text
This is a warning!
6.3.1.3. Info Text
This is a piece of info!
6.3.1.4. Images

6.3.1.5. Code
<html>
 <header>
  <title>Just a simple example</title>
 </header>
 <body>
  Hello world
</body>
</html>
6.3.1.6. Video
Video Content:
This video is available at: https://www.youtube.com/embed/QFZHNFxKZ0I
Just post the embed text in a Video Tag.
Example:
<iframe width="560" height="315"
src="https://www.youtube.com/embed/2MpUj-Aua48"
frameborder="0" allowfullscreen></iframe>
6.3.1.7. File download
Downloadable Content: "This is a sample file download block"
This download is available at: https://tome.host:443/Downloads/2035__fs_1502134401_10170.zip/
6.4. Organizing a tome
Usually the newly content is added at the bottom of the heading, although tomehost supports ordering headings and their contents, using different methods though:
- Headings - To order headings you just need to drag and drop the headings on the left sidebar treeview menu. You can move a heading inside another heading, or move it somewhere else within the hierarchy.
- Contents - Every content section (text, image, code, ...) has a menu on the left side represented by an arrow, just click on it and you should see the ordering options (Move up/Move down).
Moving content will check out the section, and the change won't be visible to the public until you publish it.
6.5. Cross references
Cross references are internal links to other sections of a tome.
6.5.1. Creating a cross reference
You can create a cross reference from within a text content box, a warning or an information block. Simply type "@" followed by either the text from the heading you wish to link to, or its section number. A menu will appear with sections that match as you type, and you can click to choose. This will format a link which will include by the section number and the heading text.
6.5.2. Behaviour of cross references
Cross references point to the ID of a particular heading, and so are independent of both the text or the section number used to create them, and that they display. If the section number later changes (because for example, a new section is inserted before it), this should be reflected in the visible text on the cross reference. Similarly, if the text of the heading is changed later, the text of any cross references will immediately be updated.
Here is a sample cross reference: @4.2. Creating/editing a tome .
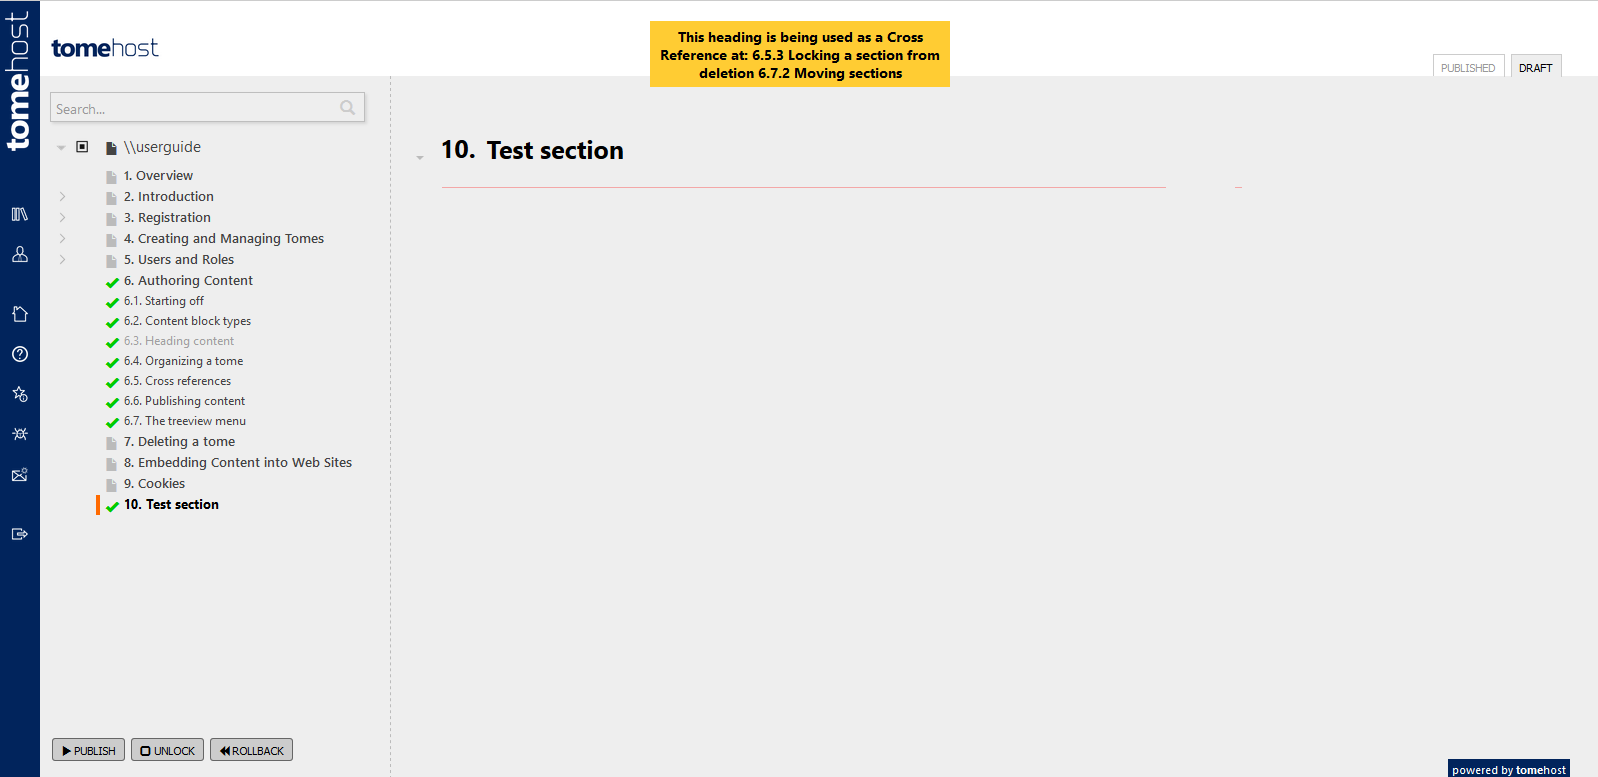
6.5.3. Locking a section from deletion
If you have a cross reference pointing at a particular heading, and then you try to delete that heading, the system will prevent you from doing this - otherwise, you would end up with cross references pointing to non-existent locations. When this happens, a notification will popup telling you where the cross references are.
In the case below, we tried to delete 10. Test section, but cross references in 6.5.3 and 6.7.2 prevented this. Once the cross references are removed from those sections, we will be able to carry out the delete operation.
6.6. Publishing content
To publish content, check the sections you wish to publish in the left hand treeview menu, and then click the 'publish' button. Click through the warning popup to confirm.
Once sections are published, the icon changes to a grey document again, indicating the item is neither checked out nor pending publication.
You don't need to publish all pending sections. If one section is ready before the others, you can publish it when ready and do the others later.
6.6.1. Rollback
If you have made changes to a section, but decide you want to cancel them not publish, you can use the 'rollback' feature. Select the section(s) to rollback in the treeview menu, then click the rollback button.
The section will be unlocked and the draft content will be reinstated to match the current published content.
6.7. The treeview menu
One of the key tools when editing your tome is the treeview menu on the left hand side of the page. This section gives an overview of the tasks you can perform from the treeview menu, which might not be obvious when you first look at it.
6.7.1. Right-click to add content
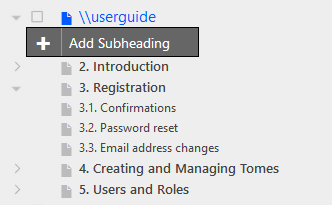
The treeview has its own right-click menu that appears when you right-click on a section. If you want to add your first section heading, or new top-level heading, right click the root of the tome (the top element in the menu) and you'll get the option to add a new subheading of the root (i.e. a top-level heading).
If you right-click on existing headings, their will be more options available, as you can insert any type of content.

6.7.2. Moving sections
To move sections and subsections around, simply drag and drop within the treeview menu. A small indicator arrow will appear to the left hand side of the numbers to show where the heading will be inserted. You can insert between to existing headings, or you can drag and drop onto a heading to nest the heading within that section.
6.8. Search
The tomehost interface has a search box on the left hand side, just above the treeview. This searches in two ways.
6.8.1. Quick search
As you type, it will try to match with heading names and highlight matching ones (bold, italic and orange). However, this only matches visible headings; it won't look inside at nested headings that have not been expanded, or at the content within a heading section.
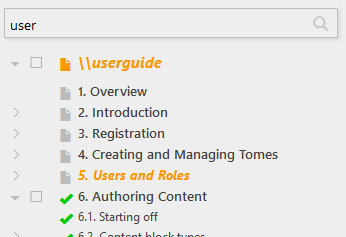
6.8.2. Full search
Click the search button or hit enter to submit a search. This runs a full search against all headings, and should produce more comprehensive results. It searches both headings and the content immediately under them for the entered keywords.
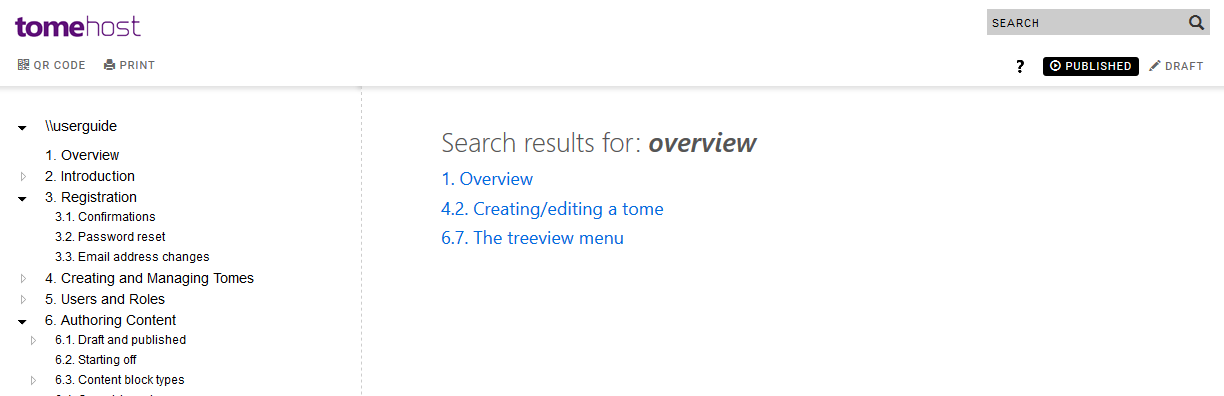
The search uses an 'AND' operator, and also searches content within a heading as well as the heading itself. So in this case above, the three sections contained the words 'user' and 'access' within either the heading and/or the content immediately under the heading.
7. Deleting a Tome
Tomes can be deleted using the trash can icon on the 'My Tomes' listing.

There is a popup warning before you delete, just in case you hit the button by accident.
Tomes are not immediately deleted, but are instead marked for deletion. From time to time, we will purge the system of tomes marked for deletion. Until then, you can still undelete the tome and restore it.

8. Embedding Content into Web Sites
If you have a web control panels on your SaaS product or web software, embedding help can make access to documentation quicker and simpler for the user, and significantly reduces your technical support demands.
Links can be placed right next to particular features in your control panel. These will bring up the exact section or subsection of the documentation that is relevant to that feature.
The tome section will appear in a popup window within the same page. This can be resized, minimized and moved around, to ensure it does not obscure form fields or important information on the page. The tome help will remain visible as the user enters information into a form, and does not require the jarring process of switching back and forth between different tabs or different programs (such as PDF readers).
tomehost has built in tools to generate the code you need to embed the tome system and links to particular sections within your control panels.

8.1. Adding the tomehost CSS and Javascript libraries
You need to link to our javascript library, and also the CSS. It's best to use the ones on our site, as these will be updated as required. You will need the following code added to the HEAD section of your pages.
<link rel='stylesheet' type='text/css' href='https://tome.host/bundles/embed-css'>
<script async src='https://tome.host/bundles/embed-js'></script>
The embed code popup includes this code, though generally if installed on the template for your web site, you may not need to add it to every page, as it is the same for all pages.
8.2. Getting the link code
Navigate to any heading in the PUBLISHED version. When you hover over it, some grey icons appear to the right. Click the third one.
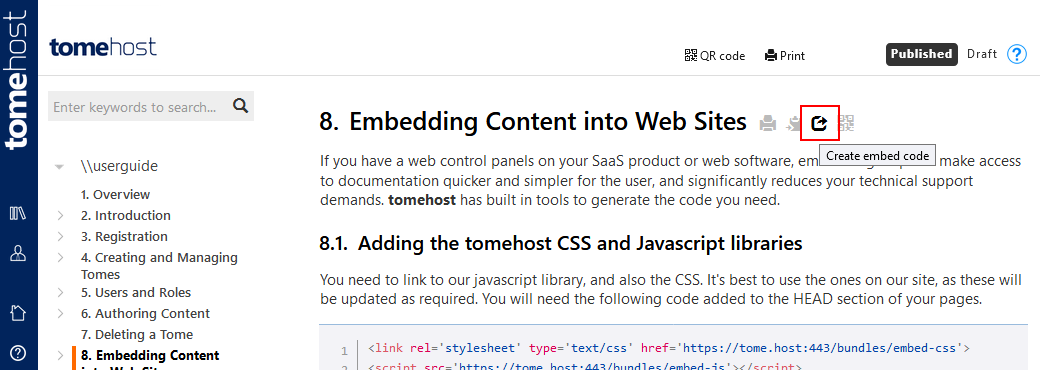
A popup appears which contains the code from @8.1. Adding the tomehost CSS and Javascript libraries above, and below that, the text for the link. Copy and paste this link text to your page.
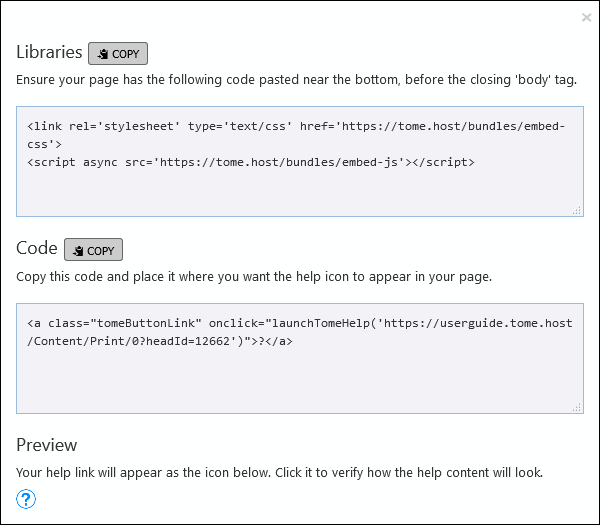
You should see the link appear as a small circle with a question mark within it. Clicking this should launch the embedded help popup, and open it to the section where you generated the link.
9. QR Codes
QR ("quick response") codes are a form of barcode; a two dimensional representation of data that can be optically recognized and read by many devices. Virtually all smartphones and tablets now have cameras and software that will recognize these codes.
On Android, Google Lens is the most common way to read QR codes. The Microsoft Launcher is also a good option; just tap the camera icon on its search box, and point at the QR code and the target tome page will open up immediately in your browser. Depending on which manufacturer version of Android you have, you may find that simply pointing the default camera app at a QR code will recognize it and give you the option to open the web site.
In Apple's iOS that runs on iPads and iPhones, you should be able to just point the camera at a QR code and will then get the option on screen to open the web site in Safari.
9.1. Generating QR codes from your tome
9.1.1. Full tome QR code
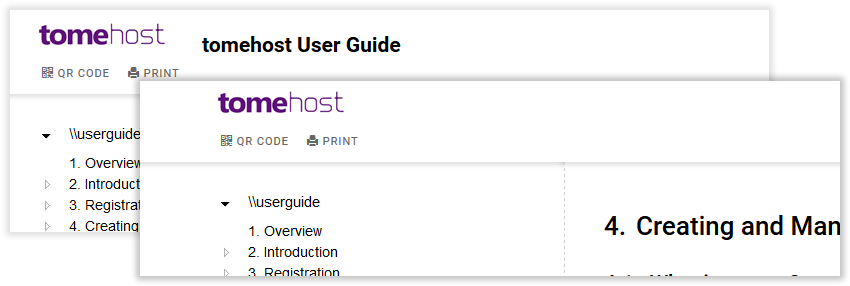
To generate a QR code that will draw users to the root of your tome, view the published tome (select the published tab if you are logged in). There is a QR code link to the top right of the page.
Note that the QR and print links are only visible on larger screens, and will be hidden on most mobile devices.
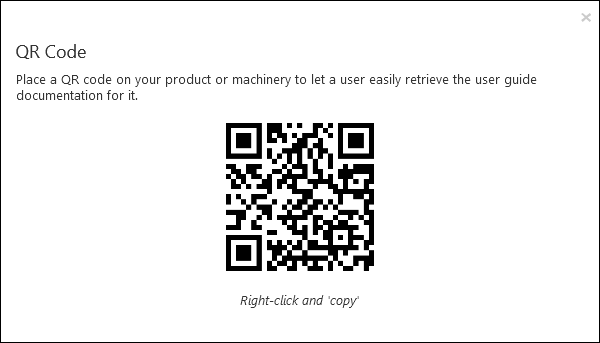
Clicking the link brings up a dialog with the QR code. You need to right-click to copy this because unlike text, most browsers don't allow images to be copied programmatically.
9.1.2. Generating a QR code for a subsection
In a complex machine or installation, you may want to direct users to specific sections of the documentation. For this, you can generate direct line QR codes from any published section. Simply hover over the heading with your mouse and you'll see a small QR code icon. Click this to bring up the QR code dialog.

9.2. Benefits
QR codes continue the tomehost principle of "problem to solution in a single click", extending it to physical items.
Machinery or complex products can have QR codes on serial number plates or labels so that anyone servicing the device can easily find the relevant technical documentation instantly. Furthermore, plant installations can have specific QR codes on various components, pulling up just the right section of the user documentation.
QR codes can be used internally in factories constructing large items such as aircraft, plant machinery, and so on, ensuring technicians can access the relevant documentation instantly.
tomehost QR codes also reduce errors, where technicians access out of date or incorrect documentation; as long as the correct QR code is placed on the item, the correct documentation will always be retrieved.
10. Visual Customization
There are a number of features in tomehost that let you change aspects of the appearance of your documentation.
10.1. Logo only
This option is available for all tomes at any user level. This option hides the text name of the tome from the header of the site, and will just show the logo. This is useful where you have a logo that includes text or is pure text, where the tome name is unnecessary.
10.2. Dark mode
This option is available for all tomes at any user level. It switches the display of the published tome to darker colours. This also applies to the embedded version. The draft view is not affected.
Note that for embedded tome popups on your own site to also appear in dark mode, you need to reference the dark mode embedded css "embed-css-dark" on your site, rather than the standard bundle. The tomehost popup that provides the code will automatically format a link to the dark mode embedded CSS if you are viewing a site in dark mode:
<link rel='stylesheet' type='text/css' href='https://tome.host/bundles/embed-css-dark'>
<script async src='https://tome.host/bundles/embed-js'></script>
10.3. Custom CSS
This is premium feature that is available to customers on an enterprise plan. It allows custom CSS code to be entered which will be inserted into the published tome pages when they are served.
This would let you make changes such as changing the header colour, the font size or styles, etc.
11. Legal Notices
11.1. Cookies
tomehost uses cookies for critical functionality.
11.1.1. Our own cookies
We plant cookies for a number of reasons:
- Authenticating users (remembering you once you logged in, so you stay logged in).
- Remembering the status of some things in response to user action.
Because tomehost uses subdomains for each individual tome, we set cookies to apply across the entire domain, including the subdomains. This means that cookies apply to *.tome.host, so once logged in, you remain logged in when you visit tomes.
11.1.2. Third party cookies
We also use third party services which may plant cookies. It's possible from time to time we may add further ones, but the key ones at present are:
- Google Analytics - this provides useful information to us about web site visits which helps us develop and market tomehost.